Thursday, January 20, 2011

SNOW DAY!!

It's a snow day -- my cable should be in the mail....which the mail is late. 
I mean the kids are taking a snow day.


The dogs are taking a snow day.

Even the squirrels are taking a snow day.

So if squirrels are allowed to go play in the snow. 

I am too!  Talk soon! 
And who knows I may get some crafting myself done today! :)

Blogger of the Month is sponsored by


Wednesday, January 19, 2011

Wednesday's Features

Me: Josh did you have good dreams last night?
Josh: No.
Me: {rolling my eyes think ahh man} Bad dreams?
Josh: No.  Just plain ones.
I'll take plain dreams anyday!
Sew This:

Everyone is reorganizing right now.  Sew 4 Home has this caddy how to that would be perfect for all you re-organizing ladies!
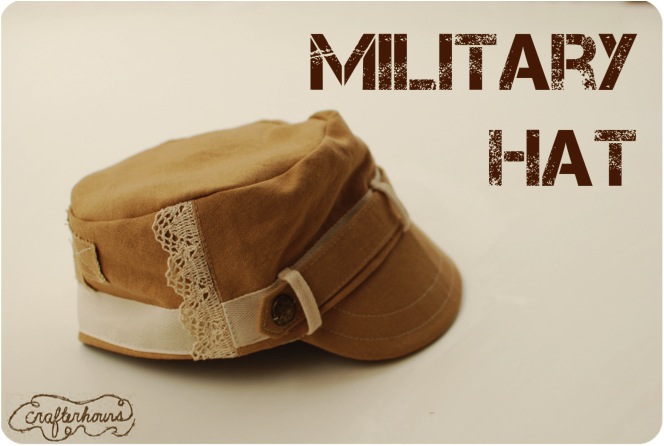
I love the military style. This hat is amazing!  I love the lace on it.  Girlies it right up!  Crafterhours has the tutorial!
How pretty is this necklace from Just Beckause?
This was one of those ohmygosh projects.  Sweet Pea and Pumpkins MADE this ball pit!!!!
That Village House is one busy mama.  And has one lucky little girl.  With some super lucky party guests.  Because she made each one a horse!!
Craft This:
fauxcanvasprint
Infarrantly Creative has up a great tutorial on how to make a faux canvas print.  I love this! And not just for our family pictures! It makes me want to take pictures of Josh’s artwork and get them put on canvas.  And …. Oh wait… I can’t tell you.  Oh I’m so excited! :)
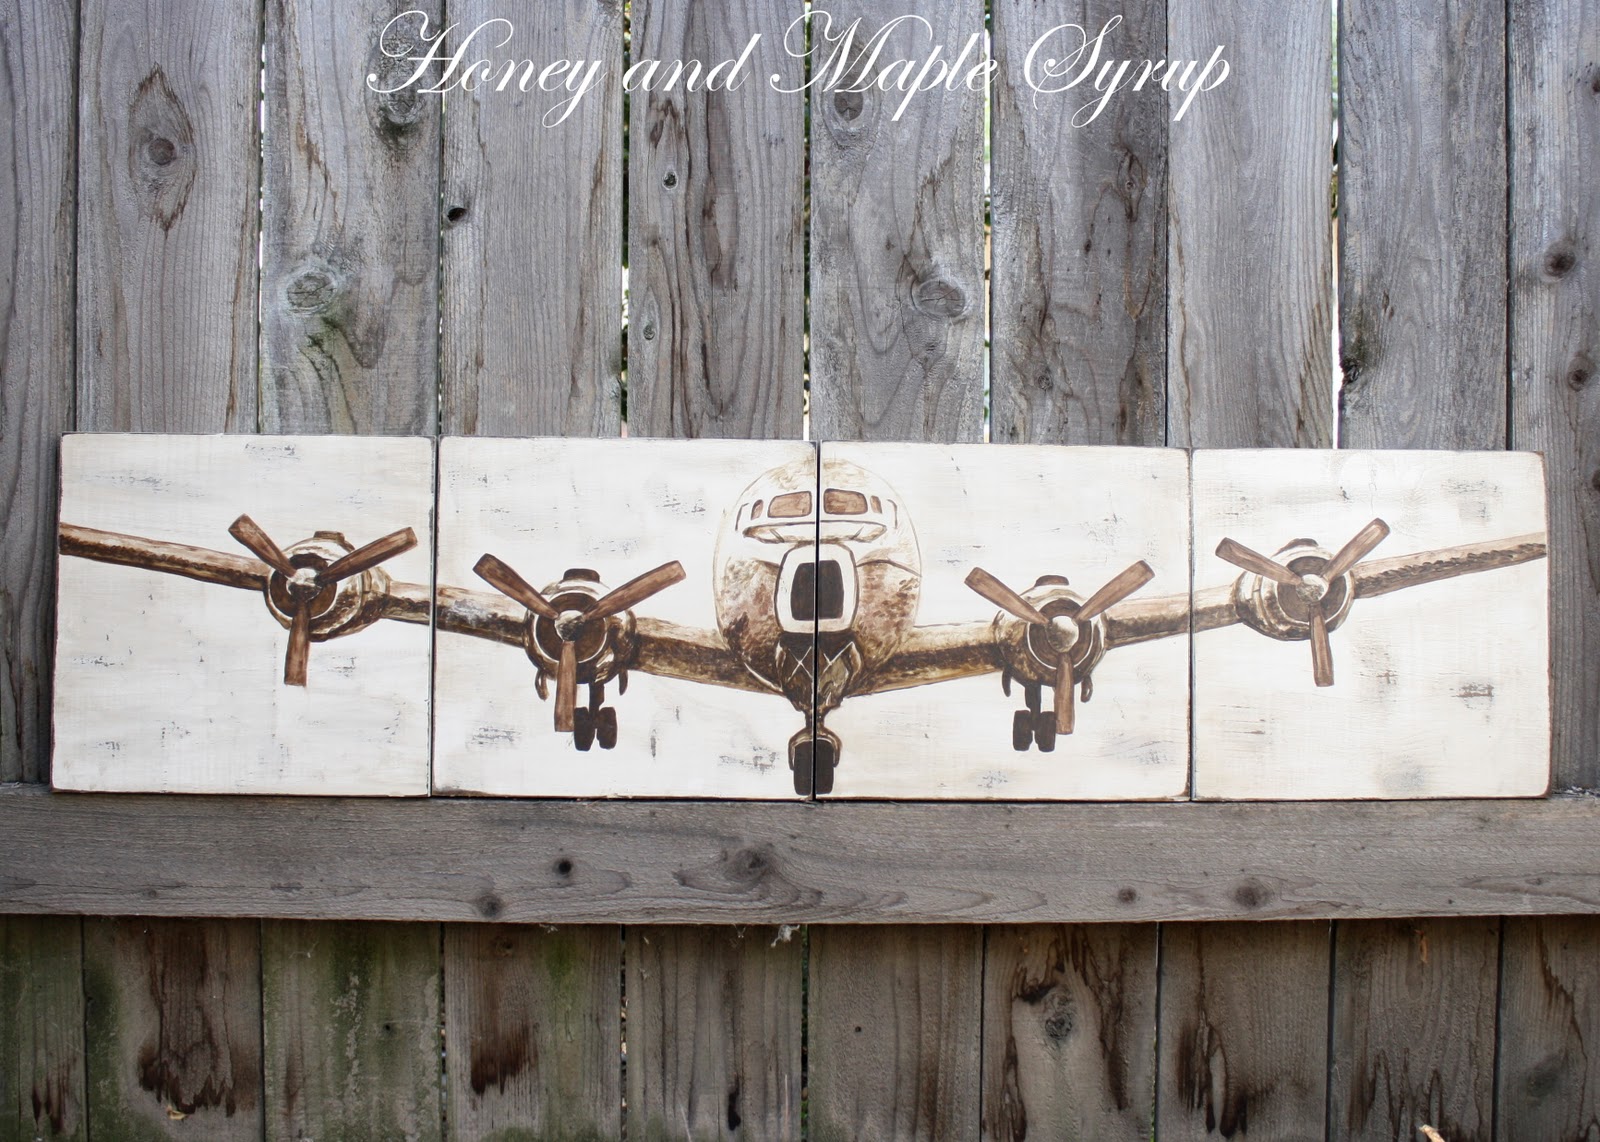
And Beckie not only writes the fab infarrantly creative blog but she also has a new blog called Knock-Off Décor.  Which is where I found this totally awesome Pottery Barn inspired airplane.  For real?  Ali from Honey and Maple Syrup drew it herself.  Now I’m great at stick people but airplanes?  Not so much. 
I love the counter top re-do over at Pretty Lil Posies.  {She’s got one crafty mama!}  I love the fact that they cost $20 even more!  Not to mention the whole kitchen re-do (which rocks) cost only $250!
Madigan Made has a really cool Magnet board up right now.  I love the Dollar Store ideas!
 
Lil Luna has this great Valentine’s Day wreath.  I love it. 
Print This:
Me Sew Crazy has a set of baby Milestone printables!  The photo op - is beyond cute. 
Freshly Squeezed has this super All You Need Is Love {are you singing along right now too?} Valentine’s Day Print
And in case you need a card to go with that bag topper from yesterday, It’s A Crafty Life has her Owl always love you print up!
Because you shouldn’t need a special day to thank a teacher – here is Tom Kat Studio’s teacher card!
Less Cake More Frosting has this super cute heart trio printable for you to frame.
Eat This:
Summer over at Sumo’s Sweet Stuff has this yummy looking popcorn on her fabulous blog today! {This is what I call a Danger Food.  Food set out in a bowl to snack on.  And it's sweet.  And yummy. Danger Danger! But if you've got will power - good for you!}
 
While he was napping cooked up theses super delicious looking double chocolate kisses!
flourless chocolate cake finished 
Topsy Turvy is like queen of cake.  Her cakes are amazing!  And here is her recipe for no flour and no gluten cake.  And chocolate!!! YUM!
Funky Polka Dot Giraffe has this cute Valentine’s Day Dinner that I’m stealing.  Josh is going to love it!  Pepperoni never looked so cute!

Food Folks and Fun had these brownies up.  And they looked yummy.  Then I found out that there were peas in them!  As a veggie sneaking mama I’ve gotta try them!
Just 11 more days til the blanket party!
Just 12 more days until the 1st Blogger of the Month party!
All sponsored by the fantastic ladies of

Tuesday, January 18, 2011

Tuesday's Features and giveaway winner!


Alright.  First off (this is the 2nd time I've written this -- darn blogger.  Why didn't it save?!  GRRR)

Blog news:
1. Blanket Link up will be here and at the Idea Room 1/31.  Come link up any blanket you've ever made.  Then, leave a comment.  Then, if you are/were a guest poster leave another comment. And If you have mailed in a blanket I will enter 2 more comments for you {And of course I will be showing off your blanket!}  Why?!? Because My Vinyl Designer has donated a prize valued at almost $200 to giveaway to one lucky blanket maker! WOO HOO!!!

2. Blogger of the Month - Since the Blanket Link up will be on the last day of the month we will be doing January's Blogger of the Month Link up on Feb. 1.  Pick out your favorite project you made in the month of January.  Link it up.  Me and some fab guest judges will pick our top 10.  Then Feb. 2nd the polls will be open.  One lucky person will be crowned Blogger of the Month.  And what will they win?  An awesome prize package from My Vinyl Designer ($60 value - it's a surprise!), 1 month of free advertising here at Today's Top 20 AND a blog highlight post for ya!

3. Winner of fabric giveaway was number 10.  Picked by Random.org.  And there's no screen shot.  Sorry guys.  But i'm no liar.  All fair in craft world.  It was Crystal.  Yea for Crystal.  I emailed you.  Email me back!! :) Crystal made a lovely comment on this fabulous art work:
Crystal said "I would have left a comment on Josh's artwork anyway because, it is awesome! That would make a cute card or a calendar page."

Thanks Crystal!!

Sew This:
I just love love love this scarf from Living with Punks.  And her boys are adorable.  I’m sure gap will be calling soon!!! I think I see their new ad!   :) But back to the scarf.  Yea. Isn’t it cool?  I’m supposed to be de-junking but this really makes me want to go thrifting and find some cool tshirts!

Sew 4 Home has these must have pot holders on their blog right now.   Currently they are doing a scrap series – you should check it out!
You want pillows?  I found pillows!  First this *adorable* gathered heart pillow from non-other than V&Co.
Next this awesome Hand in Heart pillow from A little great.
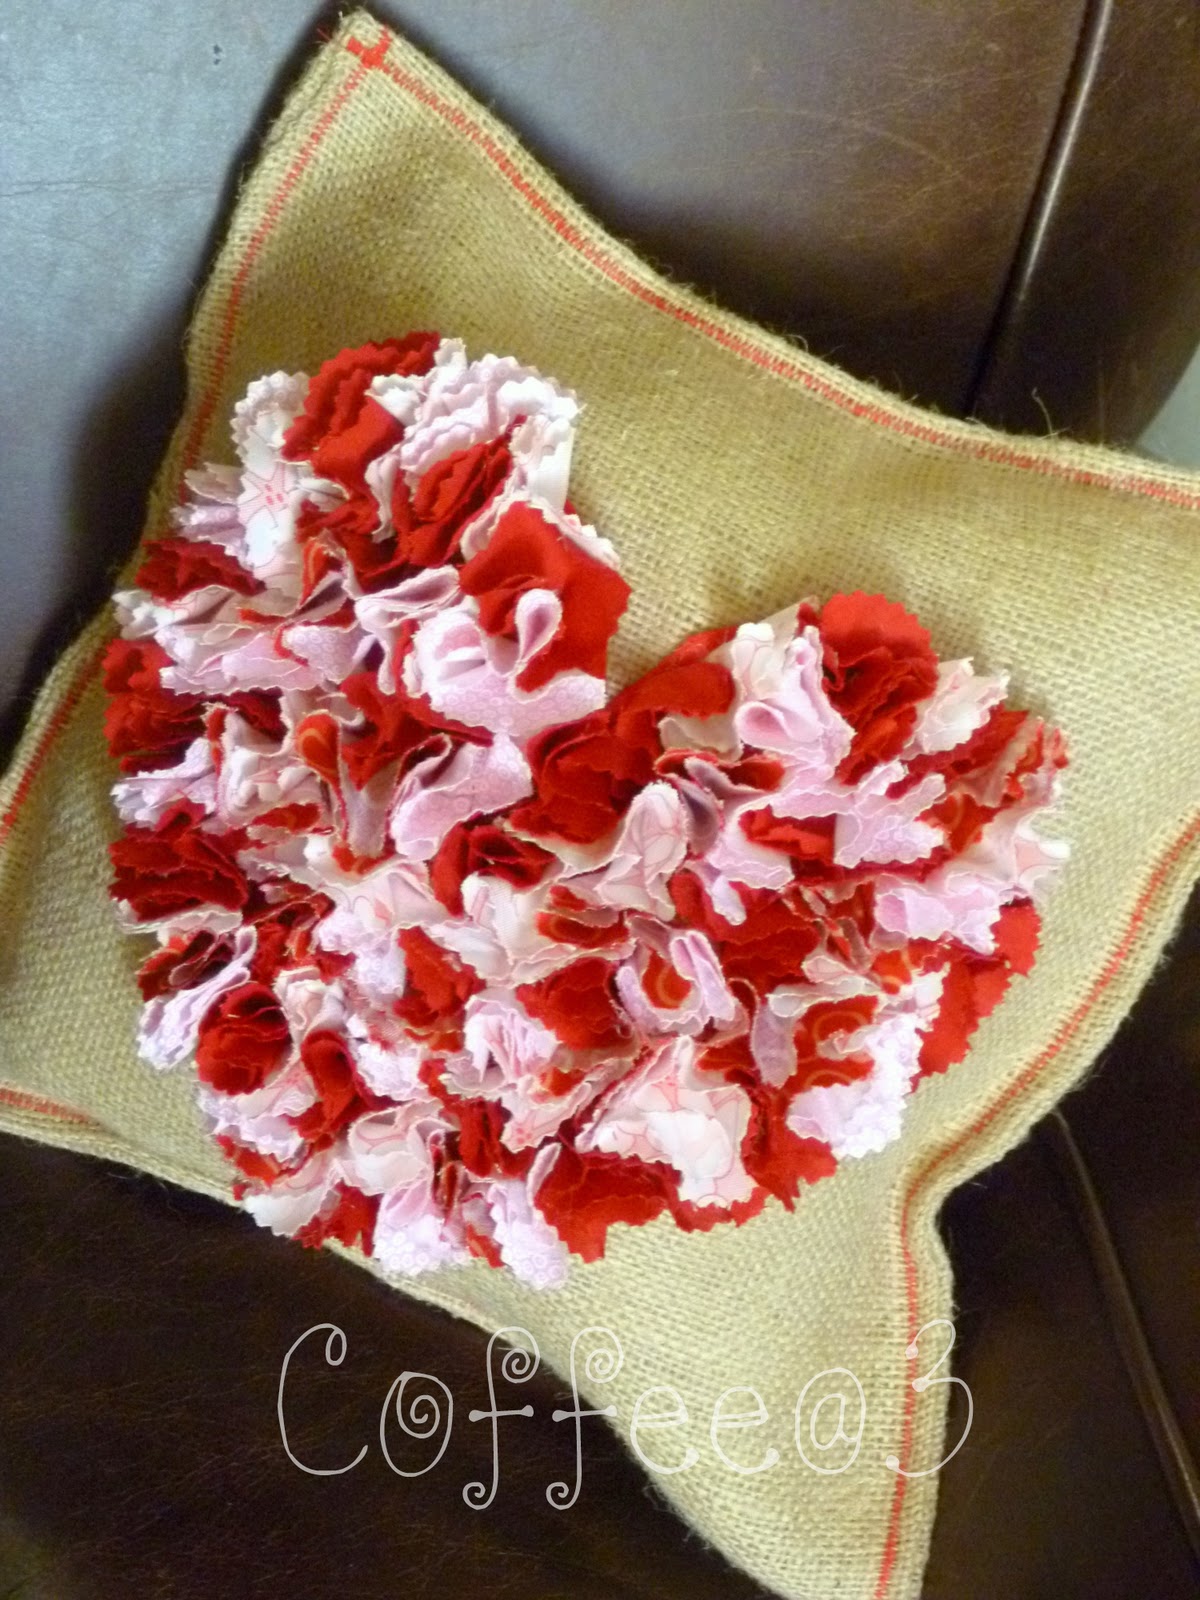
And this ruffle burlap pillow from coffee at three.  I love me some b.lap!
Craft This:
I love working with felt.  The Iowa Farmer’s Wife must too because look how awesome this car mat is!
tcg jan 13 2011 008
If I would have told my mom that in exchange for eating my Lima beans I would make her one of these wreaths…do you think It would have worked?  I’d have to seriously consider a deal like this….because look how pretty they are! {The Crafty Gals}

The Speckled dog has a tutorial on how to glaze.  I’ve never tried it before.  But her tutorial is really clear and it makes it not so intimidating.  So….hm.  What can I make over?
Craftberry bush has been making the most of this winter wonderland.  She’s made lovesicles.  How cute!
Oopsey Daisy made this cute wreath.  Does it seriously get better than burlap and lace? I don’t think so.
Print This:
Poca Cosas has the cutest little Valentines … Love them!
Need treat bag toppers?  Head on over to It’s a Crafty Life!
Valentine Fun with Guest Blogger Jo-Ann Coe - Love is Sweet Labels!
I want to print these water bottle labels for Josh’s Valentine’s Day Party at school.  These are from a guest post (Pumpkin Petunia) at Kind of Matter.
You Are... IMAGE
I’m pumped about this Just Because Series from Sprik Space.  Love it!
Modern Kiddos has a super cute chore chart for your printing pleasure.
Eat This
Talkin’ Chow Playin’ House has tons of yummy recipes.  But I love this any fruit will do crisp because…well.  Any fruit will do! :)
TPW_6052
I’ve never featured Pioneer Woman before.  Mostly because 1.  All of her stuff is amazing. 2. Chances are you all read her anyways.  But Andy would love this Cherry Cake Pudding.  And so here it is.  A reminder to myself to make it.  Sometime.  {It’s the thought that counts right?  Happy Valentine’s Day hunny I thought about making you this…Ok maybe not.}
My Grandma used to make turkey tetrazzini when I was little.  YUMMY.  I haven’t had it since.  So I will be checking out the recipe over at Simple as That!
Bubble and Sweet hooked me in with this picture?  Doesn’t that peanut butter chocolate brownie look yummy?  Quick someone make it…taste it.  Tell me how it is!
CIMG9723
Food Wine and Mod Podge has something a little more on my diet menu.  And still yummy.  Homemade granola bars. Mmmm! {And I totally need that cup...}
AND a big thanks to everyone who wrote to me in helps with our nightmare situation.  I made some good dream juice (spray bottle with water and glitter).  You may have heard of it as monster spray.  But ... if there are no monsters why would you need spray? Get my thinking here.  And guess what 2 nights...no nightmares!  YES! {I told him it's made with fairy dust.  Each color is from a different fairy.  So I guess shame on me for just adding to the fact v fiction problems.}  He's still having really bad anxiety -- something is def stressing him out.  I just don't know what.  :( One battle at a time though right?!
Remember to come back for Blogger of The Month!  Sponsored by:

Monday, January 17, 2011

Blanket Tutorial: Kojo Designs!

I love Kojo Designs blog!  They are two amazingly creative ladies!  And they have a pretty incredible Etsy shop too!
personalized stationery- custom bicycle thank you notes
I know the perfect guy who would love this!

And they have Kojo Baby with the cutest little outfits.

But Kristin and Jordan really don't need an introduction - they're sewing superstars!  And I'm so excited that they agreed to share their famous Anthro Blanket tutorial!!  Thank you girls! 

Before we get started piecing a PILE of knotted squares together, do you want the backstory on this little Anthro-inspired gem?

First, you should know that I'm a bedding junkie. I LOVE wandering through Pottery Barn, Restoration Hardware, Crate and Barrel, Anthropologie (at Park Meadows  in Denver, those stores are all conveniently located near each other as well) to see their bedroom displays. My ever-changing bedding crushes are a constant around here.

So a few years ago, I found this Thai Silk Bedding at Restoration Hardware and fell in love. I have a bad habit of loving expensive things, and this was no exception. We were still in the dual-income-no-kids category at that time and so Adam surprised me with the dream-bedding. *Note, I tried to find a picture for you, but turns out five year old bedding isn't very popular in google images. ;)

Fast forward to this fall when my oh-so-beautiful Thai Silk Bedding RIPPED. Yep, you read right... it was destroyed, not functional and, worse, not fixable! Since the era of able-to-splurge-on-bedding-we-love is long gone, just replacing the duvet cover is not exactly an option anymore.
But then, of course, I went and fell in love with the rosette bedding at Anthropologie. It shares all sorts of things with my Thai Silk Bedding... it's beautiful, and lovely, and totally out of our price range. Isn't that how things go?

When I saw the rosette bedding at Anthro, I had this idea in the back of my mind that perhaps I could try to make my own vision of knots and loveliness... but shelved it to pursue more immediately important matters (like tending to a new born baby, and creating things for sytyc, and getting ready for the parties I was throwing, and trying to stay somewhat on top of normal life). And then we made it to the Wild Card finale for So You Think You're Crafty. What better chance to try out my crazy bedding-making idea?

And thus the Anthro-Inspired Knotted Bedding was born. Thank you, So You Think You're Crafty, for giving me a chance to attempt something I might not have otherwise. My husband thanks you too. Because instead of spending $400+ on the quilt at Anthropologie (or, more likely, settling for something we didn't love nearly as much), I made this little getup for around $30. Glory, sheer glory.

Ok, now onto the tutorial. :)

To put your 'quilt' together, you'll need:
-56 knotted squares from part 1 (for a king sized quilt)
-a king sized duvet (I got the thinnest one I could find at Ikea... it was $29... fabulous!)
-sewing machine and supplies
-TONS of pins
1. Start by piecing one row of squares together at a time. Your finished product will have eight rows of seven squares. Here's the thing- in order to achieve that wonderful, gathered look, you have to create the gathers as you go. I did this by pinning little pleats in place before sewing squares together. To be more specific, I pinned five pleats along the length of each square (one tip- if you pleat both squares and pin, this will go more quickly). So, pleat, pin (right sides together) and sew.
2. Repeat and repeat and repeat until you have eight rows of seven knotted squares.
3. Now, you're going to sew the rows together to make a big square-ish mass of knotted squares. It was easiest for me to pin first where the edges between squares met up and then pin more pleats in place. Remember, every time you sew two squares together, you have to 'create' little gathers. As you're sewing the rows together, this means that you have a lot of pinning to do before you sew. Also, be sure to pin the sides right sides together. When you're finished you'll have the top part of your 'quilt.'

4. Lay out your duvet. Place your quilt with the right side (the side with all of the knots) facing down on top of the duvet. Be sure to match so that the longer side of the duvet is lined up with the row of eight squares and the shorter side of the duvet is lined up with seven squares.

Pin all the way around the edges, again, pinning pleats in place. Lucky for me, my duvet was divided into seven sections that matched up with my squares, so that was a good guideline on the short edge to make sure I was pinning evenly. On the long edges, I folded my duvet in half and marked where the middle would fall then folded it in half again and marked the quarters (on both long edges). This became my guide for even pinning on those edges.

Sew around the entire perimeter, leaving one square open. Pull the duvet through the one open square, turning the whole thing right side in. Sew your one square opening shut.

*Note- I can't say this enough, go over the ENTIRE quilt and make sure you got all of your pins out. Once you sew this baby shut, you don't want little pins pricking you. And they like to hide in the pleats, so check thoroughly!
5. Fluff your almost quilt. It almost looks right, doesn't it? Almost done! Now you're going to pin your rows in place and 'stitch in the ditch' (I followed this tutorial on youtube- haha!) so that your squares stay put and don't shift all over the place. I sewed down every other row, but feel free to do as many as you please.
 6. Can you believe it? You're done! Put this vision of loveliness on your bed and admire!

I am working on shams... I'll put a tutorial together when I get those done! Also, if you're looking for part 1, it's here.

January's Blogger of the month will be sponsored by
so make sure you come back at the end of the month to link up your favorite project of the month for a chance to win!